
Fresh markings make a parking lot easier to use. Drivers make better turns, pedestrians know where to cross, and your team spends less time directing traffic during busy hours. Parking lot line painting also reduces “guesswork” moments that cause near misses.
Faded lines create small daily problems that add up. People improvise, park too close to corners, block loading zones, or drift into fire lanes. That hurts safety and slows traffic flow, especially at busy entrances. It can also create friction for tenants when customers cannot find the right lane, the right door, or the right drop-off. This guide covers layout planning, ADA-aware wayfinding, and the practical steps that help line painting hold up through Maine weather for staff and guests, with fewer wrong turns, fewer blocked lanes, and a smoother first impression.
Plan the Layout Before Paint
Start with how vehicles actually move on your property. Identify the main entrance and the first decision point drivers face, then trace routes to prime parking, drop-offs, and exits. If people cut across open stalls to reach the door, that is a sign your pedestrian routes need to be more direct and more visible.
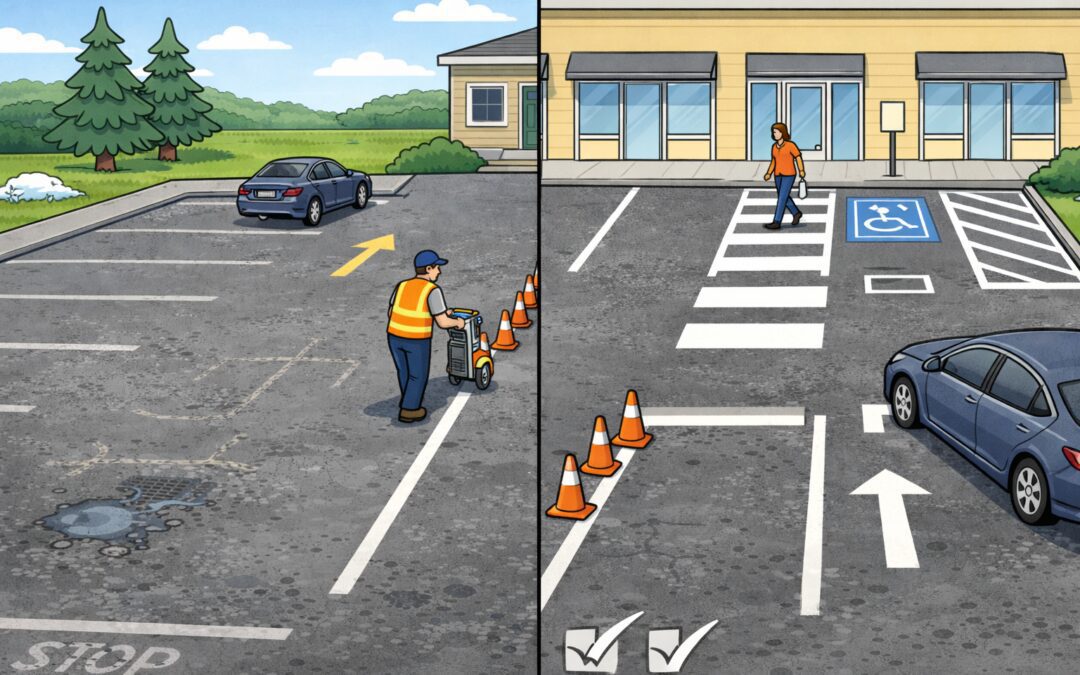
Next, map your conflict zones. These are the places where cars and people interact most: crosswalks, curb ramps, cart returns, dumpster areas, and loading zones. Confirm turning radii at corners so larger vehicles can make the turn without clipping curbs or drifting into oncoming lanes. If you have deliveries, treat your loading zone as a protected space, not a suggestion.
Finally, confirm priorities. Put accessible stalls and quick-trip stalls where they reduce confusion near entrances. Place employee parking where it lowers congestion. If you use angled parking, confirm that striping supports a smooth one-way pattern, not stop-and-go weaving. A good layout makes the right behavior feel obvious, even for first-time visitors.
ADA and Wayfinding
Accessible parking is not only a painted symbol. It is a full system that includes stall width, access aisle space, slope, signage, and an accessible route to the entrance. ADA.gov summarizes the basics, including common minimum widths and the requirement that access aisles connect to an accessible route. Review the essentials in the ADA accessible parking guidance.
For day-to-day operations, the goal is predictability. Do not place accessible stalls on steep slopes or in tight corners. Mark access aisles clearly so they do not become “extra” parking. Keep the path from the accessible stalls to the entrance clear and walkable, and avoid routing people behind parked cars when a safer option exists.
Wayfinding helps everyone, not only those with accessibility needs. Add clear arrows for one-way traffic, mark stop bars where sight lines are limited, and paint no-parking buffers at fire lanes and hydrants. If your site has multiple tenants, keep directional cues consistent so visitors do not hesitate at every turn.
Line Painting Best Practices
Most striping failures come from poor surface prep and rushed reopening. Before line painting, the pavement should be clean and dry. Remove sand, loose aggregate, and debris that keep paint from bonding. Treat oil spots and rubber buildup at vehicle stops and turns, as those areas tend to wear first.
Schedule with weather in mind. Wind, humidity, and cool temperatures can slow drying. Plan the work window so markings have time to set before you reopen high-traffic lanes. If you are striping after new asphalt or sealcoating, follow product cure guidance so the paint does not peel early.
For durability, keep line widths consistent, confirm stall lengths, and use crisp edges at crosswalks and access aisles. The U.S. Access Board notes that the ADA Standards do not specify paint color or the method of marking, but access aisles should be marked in a way that discourages parking in them. See the Access Board’s ADA parking guide.
Upkeep and Re-stripe Rhythm for Parking Lot Line Painting
Markings fade fastest where tires turn, where plows scrape, and where drivers brake at exits. Touch up high-wear areas before the whole lot looks tired. Refreshing crosswalks, arrows, and stop bars early can restore clarity and improve flow without waiting for a full repaint.
For budgeting, take a few photos each season and keep a simple map of problem spots. When you can show where the paint fails first, it is easier to plan touchups around events, deliveries, and tenant peaks. Many properties set a simple re-stripe cadence, then adjust it based on wear. A spring check after plowing and a late-summer refresh often cover the highest traffic months.
Bundle paving and striping
If your lot needs repairs as well as new markings, we can build a simple plan that keeps access open and improves flow in phases. Review our commercial paving services, learn more on our About Certified Paving Co., then contact our team to schedule a walkthrough.